

Canva has numerous tools that are used in designing. However, some tools are more essential as compared to others. Therefore, all Canva users need to know how to use these tools. This article explains seven necessary tools in depth.
1. How to download
Table of Contents
After editing and customizing your document, you may need to download and save it on your device. Here are the steps to follow:
1. Choose the design you want to create from the home screen.
2. Edit and customize the design to fit your specifications.
3. Click the Share button on the right side of the screen.

4. Locate and click on the Download button on the share menu.

5. In the download section, click the File type drop-down button and select the download format you want.
6. Next, select the size of the download file.
7. To save the download setting, Check the save download setting checkbox.
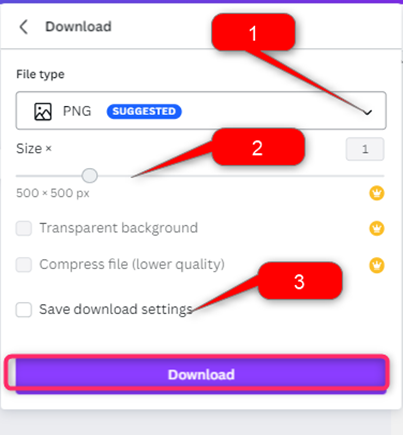
8. Click the Download button, and the design will be saved in your format.
2. How to save a design
Canva allows its user to save the unfinished designs in their accounts. Here are the steps to follow:
1. Choose the design you want to create from the home screen.
2. Edit and customize the design to fit your specifications.
3. Click the Share button on the right side of the screen.

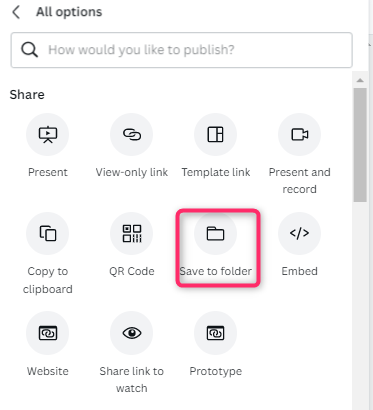
4. Click on the More button.

5. Click on the Save to folder button from the share section.
6. You can choose to create a new folder or use the existing Your projects folder.
7. If you choose the new folder option, you will be required to enter the folder’s name.
How to view saved designs
Steps to follow:
1. Log in to your Canva account. That is, visit https://www.canva.com. Enter your log-in details and log in.
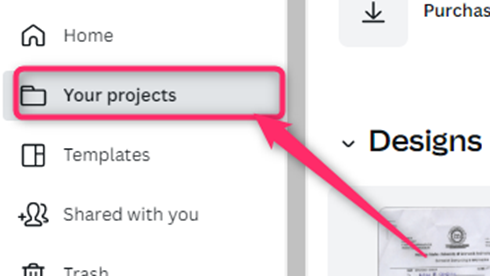
2. Click the Your projects button on the left pane.
3. If you created a new folder, navigate to the Folder section and click on the folder you created.
3. How to insert table
The table helps to visualize your data. Thankfully, Canva allows one to create and customize tables. Here are the steps to follow while creating tables in Canva:
1. Log in to your Canva account. That is, visit https://www.canva.com. Enter your log-in details and log in.
2. Choose the design you want to create from the home screen.
3. Click on the page you want to add the table.
4. On the Editor pane, click on the Elements button. Then on the Search box, search for tables.

5. Choose the table format you want from the list of displayed tables. By doing so, it will be inserted into your Canva page.
6. Resize and position the table to fit on the selected page.
7. Finally, customize and add the table details in the cells.
4. How to import pdf
Sometimes, you may wish to convert a PDF document into a design. Here are the steps to follow while using the Canva:
1. Log in to your Canva account. That is, visit https://www.canva.com. Enter your log-in details and log in.
2. Click the Create a design button and then the Import file button.

3. You will be prompted to choose the file you want to import from your device. Select the PDF file you want to import.
How to view the imported PDF file
Steps to follow:
1. Log in to your Canva account. That is, visit https://www.canva.com. Enter your log-in details and log in.
2. Click the Your projects button on the left pane.

3. Locate the Design section; the Imported file will be saved in this section.
5. How to get rid of the ruler
To turn on the ruler
Below are steps to turn on the ruler tool:
1. Choose the design you want to create from the home screen.
2. Edit and customize the design to fit your specifications.
3. Click the file button on the left side of the screen.

4. Click the Show rulers and guides button on the file drop-down
button. The ruler will appear on the top of the page you are working on.

To get rid of the ruler
Steps:
1. Click on the design you want on the Home screen.
2. Click the file button on the left side of the screen.

3. On the file drop-down button, click the Show rulers and guides button to Uncheck it.

6. How to make background transparent
Here are steps to follow:
1. Choose the design you want to create from the home screen.
2. Edit and customize the design to fit your specifications.
3. Click the Share button on the right side of the screen.

4. Check the transparent background button.

Alternatively:
Steps:
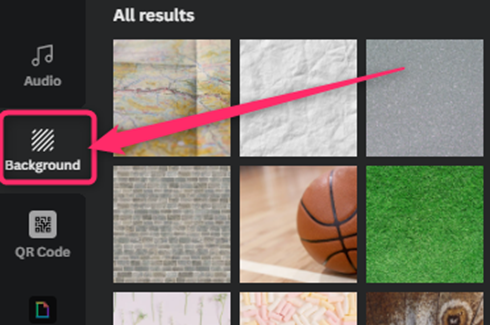
1. In the Editor pane, click on the Background button and choose the Background option.
2. Click on the added background.
3. From the Toolbar, Locate the Transparency icon at the top-right side of the toolbar.

4. Use the cursor to decrease the transparency level of the background.

7. How to add a border
Steps to follow:
1. Log in to your Canva account. That is, visit https://www.canva.com. Enter your log-in details and log in.
2. Choose the design you want to create from the home screen.
3. Click on the page you want to add the table.
4. On the Editor pane, click on the Elements button. Then on the Search box, search for Borders.

5. Click on the border style you want to add to your design.
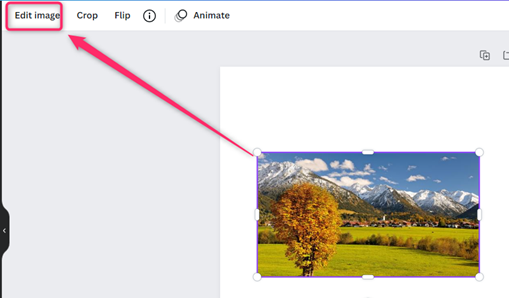
How to add a border around Image
Here are the steps to follow when adding a border to your Canva image:
1.
After inserting the Image, locate it on your design and click on it.
2. Click the Edit image button on the page’s left-top side.
3. An Edit image pane opens on the left side of the screen. Scroll downwards up to the Frame section.
4. Click the see all button. Select the frame that fits your design best by clicking on it from the list of shown frames.

5. Now, the frame will be added to your picture.
6. Resize and position the Image by holding its ends using the cursor.