

Signatures give a document a personal touch and the validity or integrity of its contents. We mostly sign off on our documents to personalize them as our own. In the past, most people relied on physical and manual ways of inserting signatures within a document.
Currently, people can do signatures digitally. They do not have to first print out the documents before signing off on them. Microsoft word offers its users the ability to add signatures to their documents. You can easily add a signature line within your document before inserting your handwritten signature as a picture. Here is what to do.
Adding a signature line in word
Table of Contents
Signature lines enable you or other word users to sign off a document. It gives the location to sign a printed document. Before we learn how to add a signature in word, let’s know the steps you can take to add a signature line.
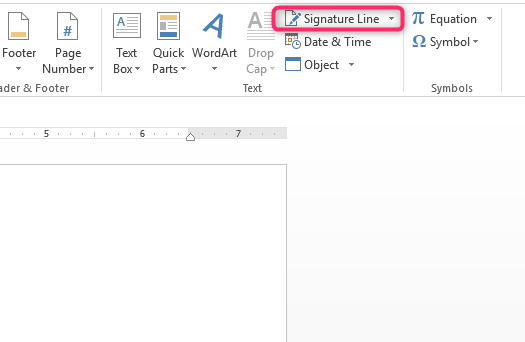
1. On the Main menu ribbon, click on the Insert tab.

2. On the Text section, click on the Signature Line option drop-down arrow.
3. On the Signature Setup dialog box, fill out all your signature details. Here you can include the name, email address, and title of the signer, who can be you or someone else.

4. Apart from this, there is an option, Instructions to the signer, where you can provide instructions. You can also select the checkbox beside the Show sign date in signature line option.
5. Once you have filled all these fields, click the OK button to add the signature line. A signature line will be inserted within your document with a cross and a line that signifies where a person has to sign.

Make sure you place the signature line appropriately within your word document. You can easily print the document and have it signed physically.
Now that you know how to add a signature line in a Word document, let’s know the steps you can take to add a digital signature in Word. Here is what to do;
Before adding a signature to your signature line, you will first need to install a security certificate for your signature. Most times, when you do not have one, word will automatically ask you whether you would like to acquire one from Microsoft’s partner. Apart from this option, you can create a personalized digital certificate. Here you will use the Selfcert tool, which is usually included in the Microsoft Office installation folder.
- Go to your Microsoft Office installation folder and double-click on Selfcert.exe.
- In the Selfcert App Tools, type a name for your security certificate. To do this, go to the ‘Your Certificate Name’ box.
- Click OK to create it. Afterward, return to your document and double-click on the signature line.
- Type your name or click the Select Image option to insert a handwritten picture of your signature in the Sign box.
- Click the ‘Sign’ option to insert the digital signature.
How to add a picture signature in Word
You can also add a handwritten signature to your word document. Here is what to do;
1. Double click on your signature line and Select Image to insert one in your document.

2. In the Insert Pictures menu box displayed, click From a File and select your signature image file.
3. Click Sign to place the image on your Signature Line.