
It automatically saves and syncs your notes as you work with Microsoft OneNote, a cloud-based program. With OneNote, you can organize your life in addition to taking notes. It functions as a digital notebook that you can keep as organized or disorganized as you like. You can also make lists, sketches, and drawings, record audio clips, and organize your life. If OneNote is new, you may wonder how to create new notebooks to save information. The notebook allows me to keep everything organized and in the proper spot, and you can use it for various themes and projects. OneNote allows you to create as many sections and pages as you’d like, but you can use it for nearly any organization you choose because you can build brand-new notebook files.
There are instances where you want to create a new notebook in a different account. You can do that by using the following steps:
1. Open OneNote on your computer.

2. On any page, in the upper left, click on the Show Notebook List button.

3. At the top of the Notebooks pane, click on your current account name.
4. Click or tap the + Add Account button in the Accounts window that pops up.

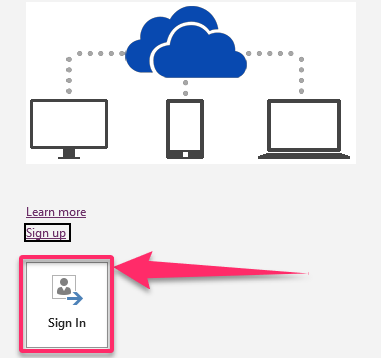
5. When prompted, sign in.
6. Scroll to the bottom of the Notebooks pane that shows and click + Notebook.
7. Enter a name for the notebook in the New Notebook window that appears.

8. Under Account, select the account you want to use for the new notebook.
9. Click Create Notebook.
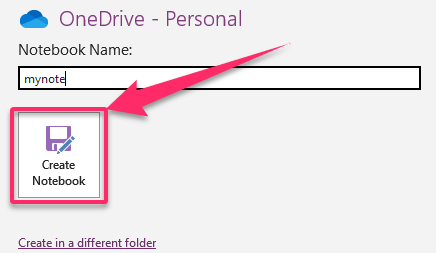
Note that you can save the notebook in different ways. By selecting OneDrive, you can save the notebook to your OneDrive account. By selecting This PC, you can store the notebook on your computer or network. You can use the Notebook Name area to the right to give the notebook a name. When you click the Create Notebook button, you create and save the notebook in either the OneDrive folder by default or the OneNote Notebooks folder on your computer in the Windows My Documents folder. Instead, click the Create in a different folder link to bring up the Create New Workbook dialog box and save it somewhere else. To find a new folder location, use this dialog box. After that, give the notebook a name in the Notebook Name section. Finally, click on the Create button to finish.