
Images are some of the elements that are found in Word. Microsoft Word allows users to insert and customize images. This article will discuss tips and tricks related to images in Word.
How to flip an image
Table of Contents
If you need to flip an image in Word, follow these steps:
1. Locate the Word icon on your Pc and double-click on it to open.
2. Press CTRL + O keys to open the existing document or a new document to that you want to add the image.
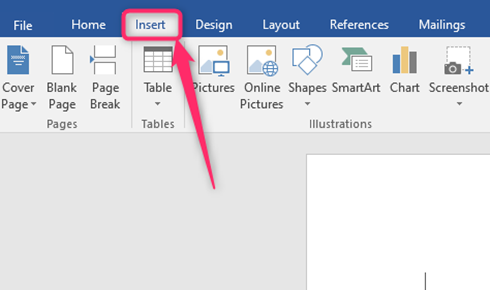
3. Click on the Insert tab, and locate the Illustrations section.

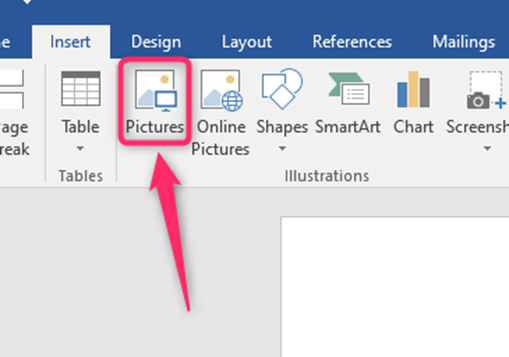
4. Click on the Pictures Button. You will be prompted to select the image to add to the page. Finally, click the Insert button.

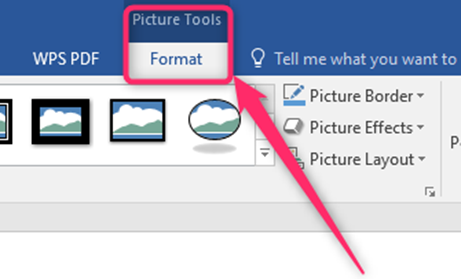
5. Click on the added image, and locate the Format tab in the Picture Tools section.
6. Locate the Arrange section, and click the Rotate drop-down button.
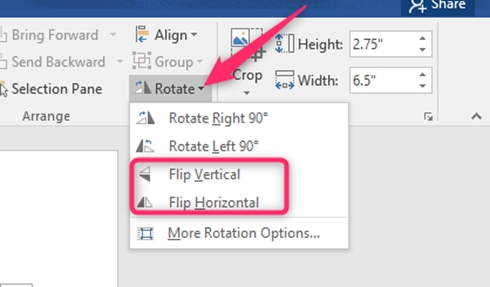
7. Click the Flip vertically or flip the horizontal button from the menu.
How to lock image
Steps:
1. Locate the Word icon on your Pc and double-click on it to open.
2. Press CTRL + O keys to open the existing document or a new document to that you want to add the image.
3. Click on the Insert tab, and locate the Illustrations section.

4. Click on the Pictures Button. You will be prompted to select the image to add to the page. Finally, click the Insert button.

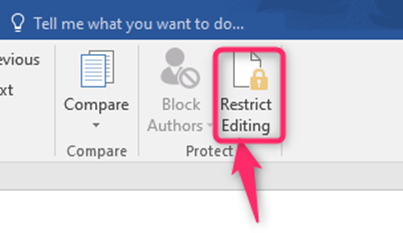
5. Click on the added image and the Review tab on the toolbar.

6. In the Protect section, click on the Restrict Editing button.
7. A restricting editing pane will open on the right side of the screen. Customize and check the checkboxes to lock the image.

How to change the size of the image
Steps:
1. Locate the Word icon on your Pc and double-click on it to open.
2. Press CTRL + O keys to open the existing document or a new document to that you want to add the image.
3. Click on the Insert tab, and locate the Illustrations section.

4. Click on the Pictures Button. You will be prompted to select the image to add to the page. Finally, click the Insert button.

5. Click on the added image, and locate the Format tab in the Picture Tools section.

6. Locate the Size section. To change the Height of the image, click on the Height up and down icons.

7. To change the Width of the image, click on the Up and down icons in this section.
How to crop an image
Steps:
1. Locate the Word icon on your Pc and double-click on it to open.
2. Press CTRL + O keys to open the existing document or a new document to that you want to add the image.
3. Click on the Insert tab, and locate the Illustrations section.
4. Click on the Pictures Button. You will be prompted to select the image to add to the page. Finally, click the Insert button.
5. Click on the added image, and locate the Format tab in the Picture Tools section.

6. Locate the Size section. Click on the Zoom button, and use the image sidebars to crop the image.
