Simply put, a grayscale image is one in which the only colors are various shades of gray. Since the editor must provide less information for each pixel, these images differ from all other types of color images. Rather than requiring three intensities to identify each pixel in a full-color image, gray color is one in which the red, green, and blue components are all equally intense in RGB space. As a result, each pixel only needs to be specified with a single intensity value in a grayscale image. Grayscale intensity is frequently represented as an 8-bit integer, allowing 256 distinct shades of gray ranging from black to white. The difference between successive gray levels is substantially more significant than the gray level resolving power of the human eye if the levels are regularly spaced. Because a large portion of today’s display and image capture gear can only support 8-bit images, grayscale images are highly prevalent. Additionally, there is no need to employ more complex and challenging process color photographs because grayscale photos are more than adequate for many applications. We will provide you with the steps you can use to grayscale an image using GIMP photo editing software.
You can grayscale a layer in GIMP by using the following steps:
1. Open GIMP on your computer.

2. Go to the File menu.

3. Click on Open and select the image with the layer you want to grayscale.

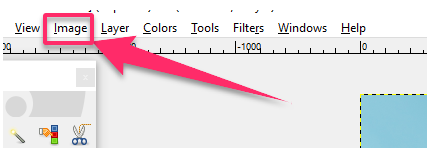
4. Go to the Image menu.

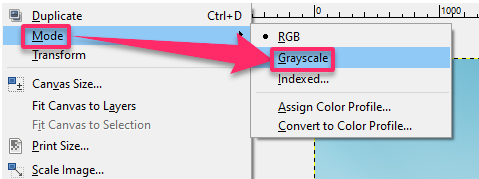
5. Click on the Mode option in the drop-down menu that appears.
6. Select Grayscale on the Mode drop-down menu.

GIMP will successfully convert your image to grayscale. Grayscale images provide two crucial pieces of information: the shift in grayscale and the local geometrical features of the picture. The primordial sketch is a means of expression that can fully and precisely convey information. In primitive graphics, the editor concentrated most knowledge on the abrupt changes in grayscale concerning the actual edges and the termination locations of boundaries. The description for each change in grayscale caused by an advantage contains the edge’s rate of change in grayscale, the overall change in grayscale, and the edge’s length, curvature, and direction. The original sketches serve as rough drafts of alterations to a grayscale image.
Dimension reduction is one of the benefits of grayscaling an image. For instance, while grayscale images are one-dimensional, RGB images include three dimensions and three color channels. It also makes models simpler. Think about developing neural networks with RGB pictures 10x10x3 pixels in size. Three hundred input nodes will be present in the input layer. The same neural network, however, will only require 100 input nodes for grayscale photos. Other algorithms can function better as a result. Numerous algorithms are explicitly made to operate just on grayscale photographs. All the best as you learn more about grayscaling your images using the GIMP photo editing software: remember to practice more, as practice makes perfect!

