
Overlays in photography are essentially an image or texture that is added to your shot as an additional layer using an editing tool. When creating a series of photos, it is usual practice to overlay various images. To make this possible, you may locate the Layer function in most editing programs, including GIMP. With the latter, you can add additional layers to a backdrop image. Therefore, you can initially alter each layer separately. This will give you the best chance to change each component to blend in with the others. A layer mask, also known as a layer mask in Photoshop, can be added in GIMP. The latter partially enables you to disclose the image underneath, thanks to a partial transparency game. Alternatively, it can make the upper image opaque to conceal some of the lower images. Therefore, this feature is rather strong and will let you make lovely photo montages, especially if you want to change a photo’s background or include a person in a picture. You can merge layers to create a single image once your editing is finished and each layer has blended with the others. So, you can capture the latter in a common format, like png or jpg. We will provide you with steps on how to overlay images in GIMP.
You can overlay images in GIMP by using the following steps:
1. Open GIMP on your computer.

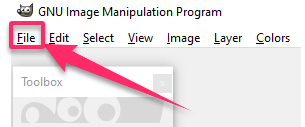
2. Go to the File menu.
3. Click on Open to open the image you want to overlay.

4. After opening the background image, you can add a new layer in various ways.
5. You can add a new image so the overlay is a background image.
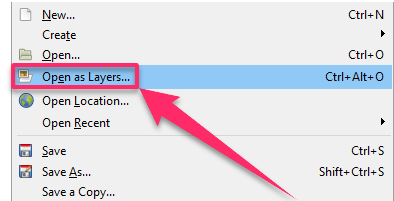
6. Go to the File tab.

7. Click on Open as Layer.
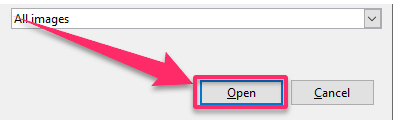
8. Select the image and see that the image appears on the image you added first.
9. You can also copy and paste the image directly into the background image.
10. It will have the effect of creating a new layer that contains the copied image.
11. You can use the keyboard shortcut of Ctrl + C to copy and Ctrl + V to paste.


12. You can also slide the image that you would like to overlay on the background image from the File Explorer towards the GIMP app.
13. You can also create a new layer that does not have an image.
14. Go to the Layers tab.

15. Press Shift + Ctrl + N or New Layer to add the new layer.

With GIMP, picture overlaying is fairly specialized and possible in various ways. The use of the layer function is required. You can repeat the steps to overlay more images, but you should be careful because the more you overlay, the more memory space you use. If you have a small memory space, you should limit the images you overlay on top of the background image. All the best as you learn more about overlaying images in GIMP and get on more practice.