The frame makes any document more presentable and eye-catching. Just like other text editors, Ms. Word allows one to add the frame to the document. However, there is no direct way of adding a framer to your document. Therefore, several workarounds must be followed to add a frame to your document. In this article, we shall discuss steps to follow when working with frames in Word.
Adding frames
Table of Contents
Here are the steps to follow:
1. To get started, locate the Word application on your Pc. Double-click on it to open the application. To create a new document, click the File button on the toolbar. Then, locate the New button.
You can also use the keyboard shortcuts to open a new document. That is, CTRL + N.

2. Enable the Developer tab.
Click on the File tab.

Click on the Options button at the far bottom side of the screen.
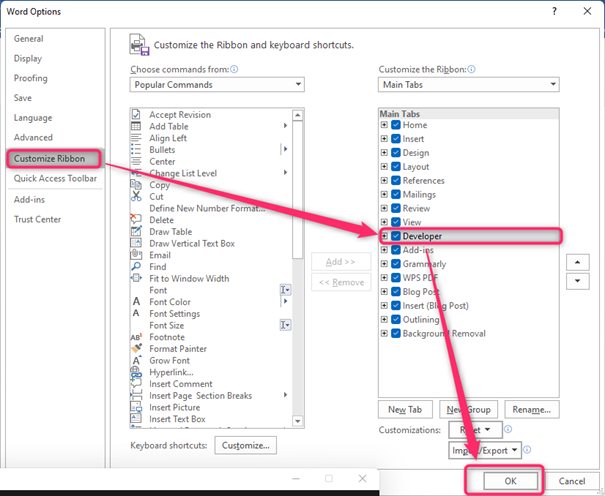
Choose the Customize Ribbon button from the Word Options dialogue box to open the customized ribbon pane.
Locate the Developer button in the main Main tab-pane. Check the checkbox in the developer section.
Finally, hit the Ok button.

3. Now, you can see the Developer tab on the toolbar section. Click on the Word page you want to add the frame.
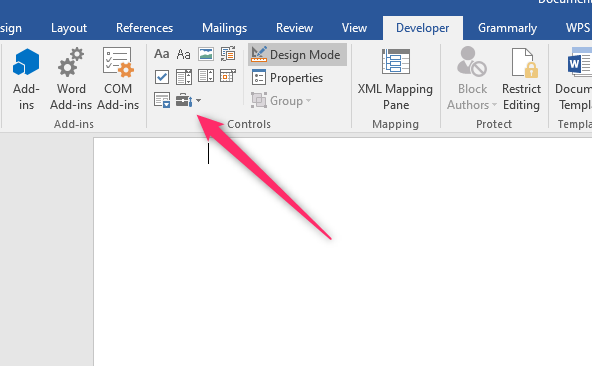
4. Locate and click on the Developer tab. From the Control section, Choose the Legacy button.

Note: To know which icon in the control section is the legacy icon, hover the mouse on top of these icons while checking the button’s name.
Secondly, a briefcase with a drop-down button next to it characterizes the legacy button.
5. From the drop-down menu, choose the Frame icon.

6. Resize the frame in your Word document.
Adding a frame to Picture in Word
Here are the steps to follow:
1. To get started, locate the Word application on your Pc. Double-click on it to open the application. To create a new document, click the File button on the toolbar. Then, locate the New button.
You can also use the keyboard shortcuts to open a new document. That is, CTRL + N.
2. Position your cursor where you want to add your image. Click on the Insert tab, and then select the Picture button.

3. Select the picture you want to add to your Word document. Then, click the insert button.

4. Resize the image using the side handles. Then, click on the added image to activate the Pictures tools in the toolbar.
5. From the pictures tools section, click on the Format tab.

6. You use the Picture style, picture border, or Picture effects to add the frames.
When using picture style to add a frame, follow these steps:
1. Click the Format tab.
2. From the picture style section, choose the style that fits you best and use it as the frame.

When using a picture border to add a frame, follow these steps:
1. Click the Format tab.
2. Click on the picture border drop-down button, and select the color to use as the frame.

When using a picture effect to add a frame, follow these steps:
1. Click the Format tab.
2. Click on the picture effect drop-down button.
3. Choose the effect you want to use as the frame of your picture.


