
After typing the document, many other customizations can be performed on the document before it is printed. This post will discuss some common customizations that should be performed on a document.
How to border page
Table of Contents
Below are the steps to follow when you need to border your page in a Word document.
1. Locate the Word icon on your Pc and double-click on it to open.
2. Press CTRL + O keys to open the existing document or new application that you wish to add the borders too.
3. Click the Home tab on the Ribbon, and locate the paragraph section.

4. Click on the Borders drop-down button, and choose the Border and Shadings button from the menu.

5. A dialogue box will open. Click on the Page Border tab.
6. In the Setting section, choose the border type you want. Then, navigate to the Styles section, and select the style you want.
7. In the Color section, choose the color of your page border. Then, click on the Apply to drop-down menu, and select the Whole document button.
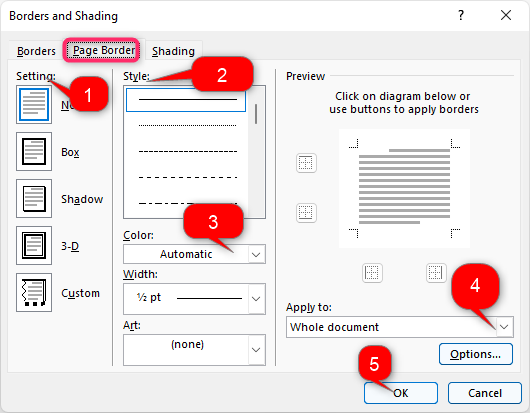
8. Finally, Hit the Ok button.
How to change the orientation of one page
Steps:
1. Locate the Word icon on your Pc and double-click on it to open.
2. Press CTRL + O keys to open the existing document.
3. Click on the page you want to change the orientation. Then, click the Layout tab on the toolbar.

4. Locate the Page Setup section, and click on the Orientation Drop-down button.
5. From the menu, choose the Portrait or Landscape option.

How to delete an empty page
a) Using the Backspace key
Steps:
1. Locate the Word icon on your Pc and double-click on it to open.
2. Press CTRL + O keys to open the existing document that you want to delete the empty pages.
3. Click on the empty page you want to get rid of, and then hit the Backspace key on your mouse. The blank page will be deleted.
b) Using the Navigation pane to delete an empty page
Steps to follow:
1. Locate the Word icon on your Pc and double-click on it to open.
2. Press CTRL + O keys to open the existing document you want to delete the empty page.
3. Click on the View tab from the toolbar on the opened document.

4. In the show section, check the Navigation Pane checkbox.

5. The navigation pane will open on the left side of the screen. On the pane, click on the Pages tab.

6. Locate the empty page you want to delete, and hit the Backspace or Delete button.
How to duplicate a page
Steps:
1. Locate the Word icon on your Pc and double-click on it to open.
2. Press CTRL + O keys to open the existing document. Locate the page you want to duplicate.
3. Highlight this page. That is, left click the, and drag the cursor until the entire page is highlighted.
4. Press the CTRL + C keys to copy the content and formatting of the page.
5. Click on the page where you want to duplicate the formatting.
6. Right-click and locate the Paste Options section. From this section, click the Keep source-formatting button. The page will be duplicated.

How to fit a table onto a page
To get started, let us insert a table in the document.
1. Locate the Word icon on your Pc and double-click on it to open.
2. Press CTRL + O keys to open the existing or new document.
3. Click on the Insert tab, and locate the Table drop-down button.

4. Choose the number of rows and columns you want to have.
5. Locate the dragging tool on the bottom-right side of the Table, and drag the Table downwards to fill the page.

How to jump to a page
1. Locate the Word icon on your Pc and double-click on it to open.
2. Press CTRL + O keys to open the existing or new document.
3. Locate the Page number at the status bar, and click on it.

4. In the Find and Replace section, click on the Go To tab, and select Page from the Go to what section.
5. In the Enter Page Number Section, type the page you want to jump to.
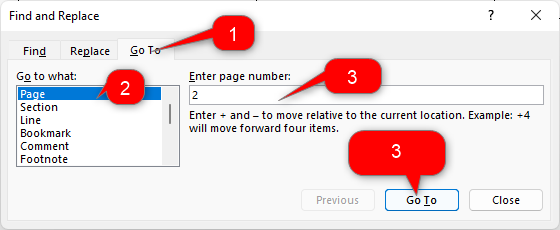
6. Finally, click on the Go To button.
How to lock a page
Steps:
1. Locate the Word icon on your Pc and double-click on it to open.
2. Press CTRL + O keys to open the existing document or a new document that you need to lock the page.
3. Place the cursor on the page you wish to lock.
4. Click on the Review tab and the Restrict Editing Button.

5. Check all the locking checkboxes.

How to next page
a) Keyboard shortcuts
1. Place the cursor at the end of the page you are working on.
2. Press CTRL + Enter keys to move to the next page.
b) Using the Break tool
Below are the steps to do so:
1. Locate the Word icon on your Pc and double-click on it to open.
2. Press CTRL + O keys to open the existing or new document.
3. Place the cursor at the end of page one, then click the Layout tab on the Ribbon.
4. Locate the page setup section, and click the Breaks drop-down button. From the menu, locate the Section Breaks, and click the Next page button.

c) Using the Page Break tool
Steps:
1. Locate the Word icon on your Pc and double-click on it to open.
2. Press CTRL + O keys to open the existing or new document.
3. Place the cursor at the end of page one, then click the Insert tab on the Ribbon.

4. Locate the Pages section, and click the Page break button.
How to open a new page
a) Using the Blank page tool
Steps:
1. Locate the Word icon on your Pc and double-click on it to open.
2. Press CTRL + O keys to open the existing or new document.
3. Place the cursor at the end of page one, then click the Insert tab on the Ribbon.

4. Locate the Pages section, and click the Blank page button.
b) Using the Page Break tool
Steps:
1. Locate the Word icon on your Pc and double-click on it to open.
2. Press CTRL + O keys to open the existing or new document.
3. Place the cursor at the end of page one, then click the Insert tab on the Ribbon.

4. Locate the Pages section, and click the Page break button.
c) Keyboard shortcuts
1. Place the cursor at the end of the page you are working on.
2. Press CTRL + Enter keys to move to the next page.
How to view only one page
a) Using the Zoom tool
Steps to follow:
1. Locate the Word icon on your Pc and double-click on it to open.
2. Press CTRL + O keys to open the existing document you want to view only one page.
3. Click on the View tab from the Ribbon.

4. From the menu, locate the Zoom section and click the one-page button.

b) Using the navigation pane
Steps to follow:
1. Locate the Word icon on your Pc and double-click on it to open.
2. Press CTRL + O keys to open the existing document you want to use this feature.
3. Click on the View tab from the toolbar on the opened document.

4. In the show section, check the Navigation Pane checkbox.

5. The navigation pane will open on the left side of the screen.

6. Click on the pages tab, and select the page you want to open.

How to link Table of contents to pages
To link the Table of content with pages, you have to set headings on these pages. Here are the steps to do so:
Steps:
1. Locate the Word icon on your Pc and double-click on it to open.
2. After typing the heading, highlight it.
3. Click on the Home tab, locate the heading styles and choose one.

4. Click the Table of the Contents drop-down button in the Reference tab.

5. Select the Table of content you want by clicking on it. The Table of content will have the page numbers.
How to number pages
a) Using the Number Format tool
Steps:
1. Locate the Word icon on your Pc and double-click on it to open.
2. Press CTRL + O keys to open the existing document or a new document that you need to number.
3. Click the Insert tab on the Ribbon.

4. In the Header & Footer section, click on the Page Number drop-down button.
5. From the menu, choose the Format Page Numbers button.

6. In the box, toggle on the Start At button and set it at 1. Then, hit the Ok button.
7. In the Header & Footer section, click the Page Number drop-down button, and choose the numbering format you want.

b) How to number pages differently
Below are the workarounds to follow number your pages differently:
1. Locate the Word icon on your Pc and double-click on it to open.
2. Press CTRL + O keys to open the existing document or a new document that you need to number.
3. Click the Insert tab on the Ribbon. In the Header & Footer section, click the Page Numbers drop-down button, and choose the numbering format you want. The document has one numbering format.

4. Place the cursor at the end of the page where you want to add another number format on the next page. Click the Layout tab on the Ribbon.
5. Locate the Page Setup section, and click the Breaks drop-down button. From the menu, locate the Section Breaks, and click the Next Page button.

6. Go to the next page, where your numbering will start. Open the Footer. Then, click the Design tab that will appear on the Ribbon. Deactivate the Link to Previous button.

7. Click the Insert tab on the Ribbon. In the Header & Footer section, click on the Format Page Numbers button.

8. Click on the Number format section in the box, and choose a different numbering system. Finally, hit the OK button.

b) Inserting page number in the header method
Here are the steps to follow when using this method:
1. Open the document to that you want to add the page number. In our case, let us use the one we just created in the Adding header section.
2. Locate the Insert button on the toolbar.

3. In the Footer & Header section, locate the Page number drop-down button and click on it.
4. Hover the mouse over on the Current Position or the Page Margins button.

5. Select the page number format you want to add in the header section.
6. Click the Close header & Footer button on the screen.

How to separate pages
Steps:
1. Locate the Word icon on your Pc and double-click on it to open.
2. Press CTRL + O keys to open the existing document.
3. Place the cursor at the end of the page where you want separate pages.
5. Locate the Page Setup section, and click the Breaks drop-down button. From the menu, locate the Section Breaks, and click the Next Page button.

6. Go to the next page and open the Footer. Then, click the Design tab that will appear on the Ribbon. Deactivate the Link to Previous button.

How to view multiple pages
Steps to follow:
1. Locate the Word icon on your Pc and double-click on it to open.
2. Press CTRL + O keys to open the existing document you want to view only one page.
3. Click on the View tab from the Ribbon.

4. From the menu, locate the Zoom section and click the Multiple Pages button.

How to view pages side by side
This feature is used to compare two or more documents. Here are the workarounds to use this feature:
1. Locate the Word icon on your Pc and double-click on it to open.
2. Press CTRL + O keys to open the existing document.
3. Click on the View tab from the Ribbon.

4. From the menu, locate the Views section and click on the Print Layout button.

5. Then, locate the Windows section still in the View tab.
6. Click the View Side by Side button.

7. Select the other document you want to open in the dialogue box.
8. Finally, hit the OK button.
