The crop tool in any picture editing program is the most helpful for trimming off outside areas of an image. All user-friendly and effective photo editors offer an essential crop tool. Unfortunately, only a small number of them have much to offer regarding cropping based on forms. GIMP is a free photo-editing program accessible on Windows, macOS, and Linux. Unfortunately, it lacks the shape crop feature despite being around for a while. That does not preclude you from succeeding in it, though. First, you need to use a workaround. Then, you can crop pictures in any manner. In this guide, we will show you how to cut a photo in GIMP into a circle. The approach is also applicable to various shapes, such as ovals. If desired, the Ellipse Selection tool has high-quality anti-aliasing and can select elliptical and circular sections from an image. Finally, we will provide you with the steps you can use to choose a circle in GIMP.
You can select a circle in GIMP by using the following steps:
1. Open GIMP on your computer.

2. Go to the File menu.

3. Click on Open and select the image you want to crop.

4. Click Open.

5. Click on the Ellipse selection tool in the oval-shaped toolbar.

6. Using your mouse draw a circle on the desired area of the image.
7. Check the Fixed option from the Tool Options in the left sidebar.

8. Draw a circle.
9. Click and drag the mouse on the selected area to alter its position and use the four corners of the selection to increase ad decrease the selection size.
10. Right-click on the selected area.
11. Go to the Edit menu.
12. Click on Copy.

13. Open the second image in GIMP.
14. Right-click on the new image.
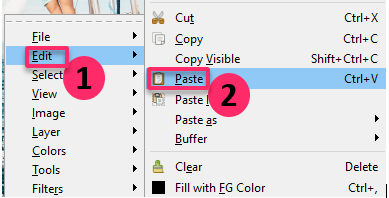
15. Go to the Edit menu.
16. Click on Paste.

17. Under the Layer in the sidebar, right-click on the Floating selection layer.

18. Select To a new layer.

19. Go to the File menu.

20. Click on Export As.

21. Select the location and file type.
22. Click on the Export button.

Another method of removing the background is another method for producing circular images. This technique will also have an image with a translucent background. Using the selection tool, you may also draw a circle or an ellipse on an image. Making an elliptical selection and then stroking it is the quickest and most adaptable method for making an oval outline. However, this method produces somewhat shoddy anti-aliasing quality. The editor can make two elliptical selections with various quality levels to provide an overview of higher quality containing different sizes. There are many advantages to rounded graphics. As profile images on social networking, they are usable. You may overlay them on any image to give it a unique look if it has a transparent background. You can also erase the circularly cropped area and replace it with a new image in GIMP. All the best!

