Tables are an important feature in PowerPoint that is very helpful in presenting and organizing your text and data. Tables help you in showing detailed information like easy-to-read format texts and numbers. You will use columns and rows in the Insert tab to achieve this. It will provide your audience with a visible illustration of your data in a way that is easy to go through as you present. But to use tables in PowerPoint, you will need to know how to insert the tables, rows, and columns. We will help you understand how to work better with tables to use them effectively in your presentation. That is in a way that is not too much or too little.
How to delete a row in the table in PowerPoint
Table of Contents
You can delete a row in the table in PowerPoint by using the following steps:
1. Go to the slide containing the table with a row you want to delete.
2. Click a table cell in the row you want to delete.

3. Select the Layout tab.

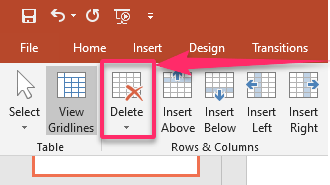
4. Select Delete from the Rows and Column group.

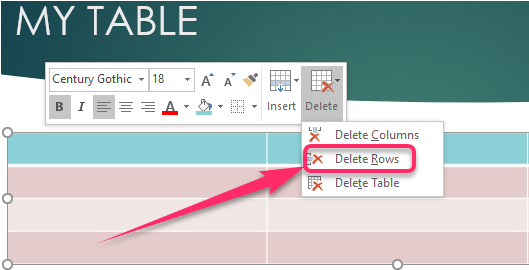
5. Click on Delete Rows.

You can also:
1. Right-click the table row you would like to delete.
2. Select Delete in the menu.
3. Click on Delete row to delete the rows.

How to insert a row in the table in PowerPoint
You can insert a row in the table in PowerPoint by using the following steps:
1. Go to the slide where you want to insert a row.
2. Click on a table cell in the row below or above where you would like the new row to be.

3. Select the Layout tab.

4. Click on Insert Above to add a row above the selected cell.

5. Click on Insert Below to add a row below the selected cell.

6. Repeat the process if you want to add more rows to the table.
You can also:
1. Use a keyboard shortcut to insert a row to your table.
2. Press Ctrl + Alt + Shift + Up to add a row above the one that you have selected.
3. Press Ctrl + Alt +Shift + Down to add a row below the one selected.
After reading the information provided, we hope you can now work with rows in tables more comfortably.

