

Autocorrect is a Word feature that helps users correct words in the suggested language. This tool simplifies the working in Word; therefore, all users should know how to use it. In this article, we shall discuss how to change the autocorrect feature and use it.
To Turn on the autocorrect feature
Table of Contents
To use the Autocorrect feature, you need to enable it first. Below are the steps to turn on the Autocorrect tool in Word:
1. Locate the Word icon on your PC and double-click on it to open the application. On the opened document, locate the File tab on the toolbar, and click on it.

2. From the file menu, click on the Options button. Doing so will open a Word options dialogue box.

3. On the dialogue box, click on the Proofing button. Then, select the Autocorrect Options button. This will open Autocorrect dialogue box.

4. Click on the Autocorrect tab, and toggle on all the checkboxes in this section. Click the OK button.

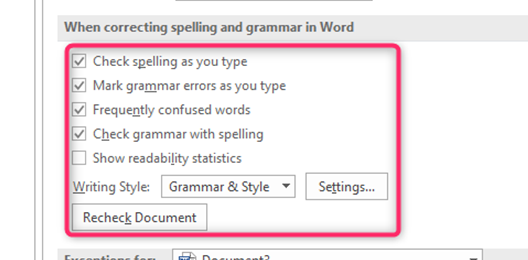
5. Next, in the “When correcting spelling In Microsoft office program,” Choose when the autocorrect should be ignored or enforced.

6. To change the dictionary that will contain the suggested words, click on the Custom Dictionary. Choose the language you want.

7. Lastly, choose when the Autocorrect feature should check your document.
To Turn Off Autocorrect
Steps:
1. Locate the Word icon on your pc; double-click on it to open the application. On the opened document, locate the File tab on the toolbar, and click on it.
2. From the file menu, click on the Options button. Doing so will open a Word options dialogue box.

3. On the dialogue box, click on the Proofing button. Then, select the Autocorrect Options button. This will open Autocorrect dialogue box.

4. Click on the Autocorrect tab, and uncheck all the checkboxes in this section
5. Next, in the proof section, uncheck all the Autocorrect checkboxes in this pane.
How to use Autocorrect
Here are the steps to use Autocorrect in Word:
1. Open the word document you want to check errors using the Autocorrect feature. To create a new document, click the File button on the toolbar. Then, locate the New button. You can also use the keyboard shortcuts to open a new document. That is, CTRL + N.
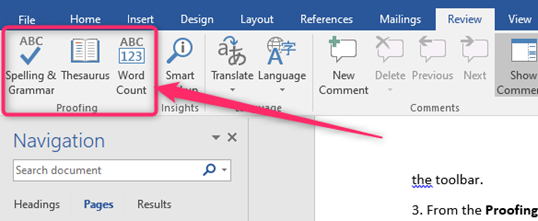
2. Locate the Review tab on the toolbar.

3. Click Spelling &Grammar or Thesaurus button from the Proofing section.
4. If you choose the Spelling & Grammer Button, a grammar pane will open on the right side of the screen. Use it to change the Word.
Alternatively,
While working on the document, some words will automatically change to the correct form or format.