A free, multi-platform graphics editor is GIMP, also known as the GNU Image Manipulation Program. Users can design a new logo or banner with the help of its various capabilities. The Text Along Path tool is among the features. Using the Text Along Path tool, the text is transformed into polylines and placed along a predetermined path. This tool can assist in producing designs with curved, rounded, and text that has various flexes. The majority of users still don’t understand this technology, though. The Text Along Path tool in the GIMP will be covered in detail in this article. The user must first design a path to use the Text Along Path tool in GIMP. Making a path from tools can be done in a variety of ways. You can convert any selection into a path using either the path tool or any other selection tool. You can use this Text Along Path tool for various entertaining ideas. We will review the fundamental concepts and procedures for using this tool, but you can customize it even more to suit your interests.
You can write text along the path in GIMP by using the following steps:
1. Open GIMP on your computer.

2. Go to the File menu.

3. Click on Open and select the file you want to use.

4. Click Open to load it in GIMP.
5. You can also click on New to create a new file.

6. Click on OK.

7. Click on the Paths tool and create a path to your preference.

8. Go to the Layers dialog.
9. Click on the Paths tab.

10. Click on the Eyeball icon to show the path.

11. Click on the Text tool icon to enter the text anywhere on the image away from your path.

12. In the Layers dialog box, right-click on the Text layer.

13. Select the Text Along Path option to show the text around the path you made.

14. Click on the New Layer icon to create a new layer.

15. Select Transparency for Fill with option.

16. Go back to the Path tab over the Layer dialog.

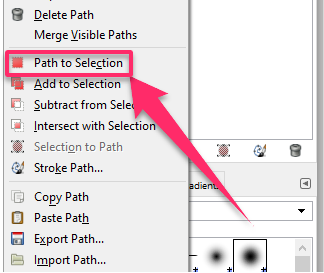
17. Right-click on the new path that will be made there and select the Path to Selection option.

18. Click on the Edit menu in the menu bar.

19. Select the Fill with FG Color or Fill with BG Color depending on the color set in those.

20. Click on the Select menu in the menu bar.
21. Select the None option to deselect the path.

22. Delete the text path or click on the eyeball icon to hide it.

23. Select the Rotate tool to move the text in the direction it looks better.

24. Once done, click on the Layer menu in the menu bar.

25. Select the Layer to Image Size option to change the text layer to the image.

You have successfully written text along a path using GIMP! However, you should practice more to do it well because practice makes perfect. Happy editing!
