An alpha channel of a layer is a grayscale image that is of the same size. An alpha channel can make areas of the layer partly transparent. Transparency is achieved through the alpha channel. Transparency means that whatever is underneath your image will be visible when you export it as an a.png file. This is excellent for photos or app icons used in web design. The name of your layer should be bolded if it lacks an alpha channel. When it has an alpha channel, it should be bolded. If you right-click on the layer, the Add alpha channel should be grayed out. You can add transparency if the image has an alpha channel. You can reveal what is behind the image by erasing some elements from it. If GIMP does not automatically add an alpha channel when you add layers to your image, there are methods you can use to achieve this. We will provide you with the methods you can use to add and edit an alpha channel in GIMP.
How to add an alpha channel in GIMP
Table of Contents
In GIMP, adding an alpha channel may give your image transparency. The additional channel informs the computer of the image’s transparent regions. As soon as you add a second layer to your image, an alpha channel is instantly added to the Channel Dialog. It stands for the image’s transparency. If only one layer exists in your image, the background layer does not have an Alpha channel. In that case, you can add an Alpha Channel in GIMP by using the following steps:
1. Open the GIMP application on your computer.

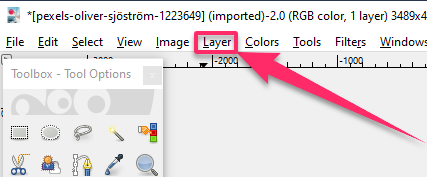
2. Go to the Layer menu.

3. Select the Transparency submenu.
4. Click on Add Alpha Channel.

Note that it’s possible that your image already has an alpha channel if neither of these techniques yields the opportunity to add one. If it contains numerous layers, GIMP might have automatically added one without informing you. Now that you have learned how to add an alpha channel. We wish you all the best!
How to edit alpha channel in GIMP
You can edit the alpha channel in GIMP by using the following steps:
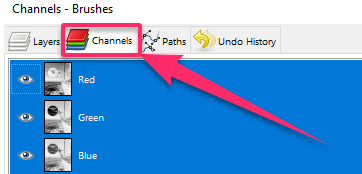
1. Select the Channel tab with Layers/Channels/Paths in the tool panel.

2. The Channel tab will show the RGB (Red, Green, and Blue).

3. Create a new channel by using the button located at the bottom of the panel. This is your alpha channel.
4. Use the little eye icons to toggle the alpha channel on or off.

5. Copy or draw your information into the channel.
Note that you must be cautious regarding file formats when saving. The whole alpha channel is saved independently of the color information in files .Tiff and .TGA. However, Photoshop does not permit this with PNG, much to the frustration of many developers. To reduce file size, it frequently strips off color information for entirely transparent areas and fails to save alpha channel images properly.

