
Microsoft Word is a good addition to the desktop publishing revolution. The program allows users to place decorative borders around their documents. With the aid of word border templates, Microsoft word users can produce professional-looking and distinct documents. Using the Microsoft Border and Shading tool, this is made possible.
Below, we explain to you how to create fancy and decorative borders for your word documents.
Using the Borders and Shading tool to create decorative borders.
Table of Contents
1. Choose a Border Type
2. Go to the Home tab on the main menu ribbon.
3. Go to the Paragraph section and click on the drop-down arrow next to the Border option.

4. On the drop-down menu list, click on Borders and Shading to display a pop-up window.

5. On the Borders and Shading windows, click on the Page Border tab
6. Under the Setting section, select your preferences. Here you can select Box to create a basic border. The Shadow option will add a shadow to your border edges. The 3D option will include 3D effects and a Custom option to set your personalized style. In our case, we will select the Box option.

Create a Borders Style
- To create a decorative border, select an option in the Style box. Choose a preferred style from the color section for the color of your border. If you want to use a clip art border, select Art and choose an image from the given list.
- Also, use the width and color to form a border.
Check the Borders settings.
- On the Preview pane box, use the boxes to choose where you want your decorative border to show. The Preview panel will display what the border will look like. You will do this because, by default, borders usually appear at the bottom, top, and sides of a document.
- Click on the Apply To drop-down arrow and choose where the border will appear in your document. It can either be on the whole document or in different sections. On the different sections, you can select the border to apply on this section only, this section – First page only, or this section – All except the first-page option.
- Choose your border options. Here you can set the Margin.
- Click OK to insert the decorative border within your document.
How to use Microsoft Templates with decorative borders
1. Go to the File tab on the main menu ribbon.
2. On the displayed list on the left pane, click on the New option.

3. Type the border in the search bar and select the magnifying icon on the bar to start a search query. Note that you can also search by document type.
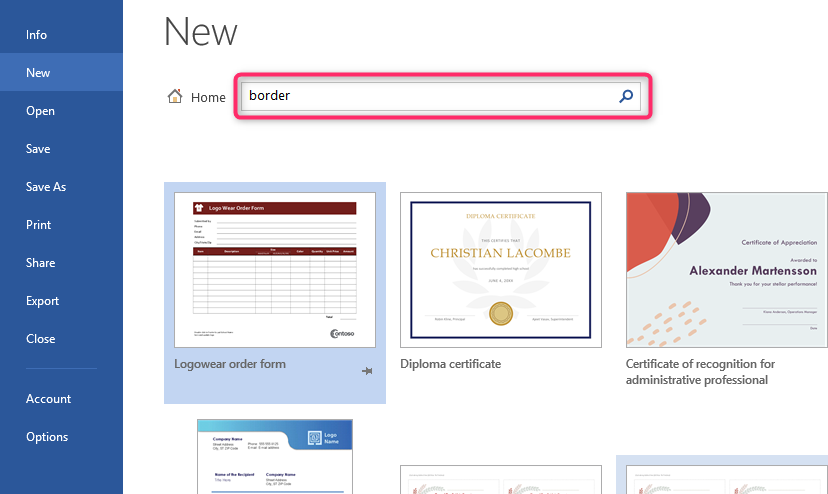
4. Afterward, select
Creating a border using the Design tab
1. On the Main ribbon, click on the Design tab.
2. Click on the Page Borders option to display a pop-up window on the Page Background section.

3. In the displayed Borders and Shading window, click on the Page Border tab.

4. Select your preferences on how you want your decorative border to look.
5. Click the OK button to apply your border.