When you create a table of contents for your word document, it is usually based on the headings within your document. Word can automatically create a table of contents when you apply the Heading 1 style. You can also apply the Heading 2 style to create a table of content with all major headings within your document. Heading 3 style will include all the subheadings.
The article below discusses how to add to an existing table of contents in word. Here is what to do.
How to create a TOC in word
Table of Contents
Before you learn how to add to an existing table of contents, let’s get to know how to create the table. You can create a TOC by applying the heading styles within a word to each section after finishing a document, or you can add one as you go. Heading styles will make it easier to insert a table of contents.
1. Put your cursor where you want to insert your table of contents.
2. On the main menu ribbon, click on the References tab.

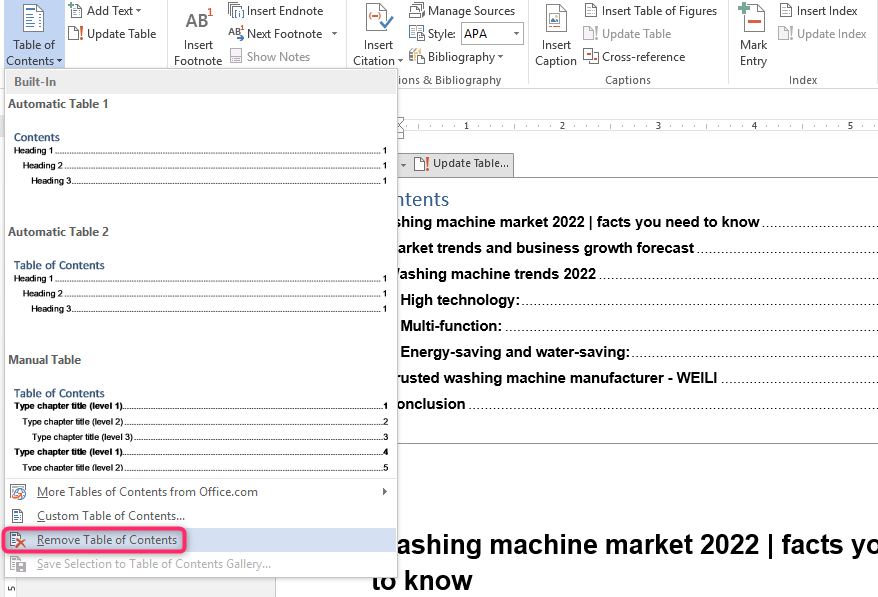
3. On the Table of Contents group, click the drop-down arrow next to the Table of Contents to display a drop-down menu.

4. On the displayed drop-down menu, select your preferred option. Here you will get three different built-in table options. There is Automatic Table 1, Automatic Table 2, and Manual Table.
5. You can also choose the Custom Table of Contents option to personalize your table of contents. In the TOC window, click on the Options button.

6. Next, select the preferred style you want to use, the TOC level, and click OK when you are done.

Steps to take when adding to an existing table of contents.
Sometimes you may need to add or remove a section within your document. You can easily update your TOC to reflect any changes you make. Doing this is easy with only a few steps. Here is what to use.
1. First, locate and click on the table of contents to select it and display a pop-up menu.
2. In the pop-up menu, click the Update Table option and choose your preference. Or you can right-click on the table of contents to display a pop-up menu.

3. Click the Update Field option to display a pop-up window on the displayed pop-up menu. Here you can choose whether to Update the page numbers only or the Update entire table option in the dialog box that appears.
4. Click OK to apply the changes you have made. Your table of contents will then update and reflect any changes you have made.
Deleting a table of contents
When you want to remove a table of content, you can take the following simple steps.
1. Locate and click on your table of contents to select it.
2. Click on the drop-down arrow on the displayed pop-up menu.
3. Click on the Remove Table of Contents option at the bottom of the drop-down menu. Word will automatically remove the table from your document.


