GIMP is a capable piece of image-editing software. Both the program’s extensive feature set and it’s free and open-source licensing contribute to its popularity. GIMP allows users to make simple and sophisticated edits to any digital image. GIMP offers a variety of modifications, including the ability to change an image’s brightness. If you have taken an image and it looks too dark, you will need to brighten the image. The brightness and contrast must be properly balanced for your image to be visually appealing and have a professional appearance. Additionally, it facilitates the perception of the image. Brightness will be useful if the image is generally light or dark because you cannot change some isolated parts of the image. GIMP provides you with the tools you can use to brighten your images if they are too dark, making them dull. We will provide you with these steps that you can use to brighten your images in GIMP.
You can brighten images in GIMP by using the following steps:
1. Open GIMP on your computer.

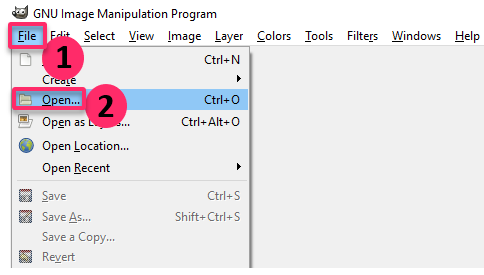
2. Go to the File menu.
3. Click on Open to open the image file you want to brighten.

4. Three windows will open. The image window, the toolbox, channels, paths, undo, and layers dialog.
5. If the channels, paths, undo, and layers dialog does not open by default, right-click on the image.
6. Select Windows.
7. Click on Recently Closed Docks, and you can pick it from there.

8. Select the Layers tab inside the dialog.
9. Click the duplicate layer button in the layer’s dialog to create a duplicate layer.

10. Right-click on the new layer.
11. Select Edit Layer Attributes and rename the latter to Overlay.

12. Make sure the overlay layer is selected.
13. Right-click on the image.
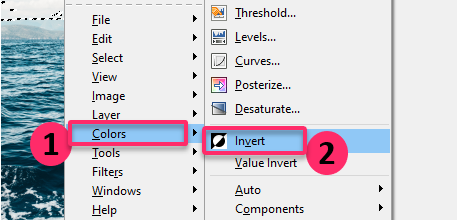
14. Click on Colors.
15. Select Invert.

16. Right-click on the image again and click on Colors.
17. Select Desaturate.

18. Click OK to accept the default.

19. Right-click on the image.
20. Click on Layer.
21. Select Mask.
22. Click on Add Layer Mask.

23. Select a Grayscale copy of the layer.
24. Click Add.

25. Left-click on the place that says Normal next to Mode.
26. Select Overlay on the drop-down menu at the top of the Layers dialog box.

27. You have created an overlay that lightens the shadows in the image a little without lifting the highlights.
28. To see how the Overlay layer has lightened the shadows in the original image, click on the eye button to the left of the Overlay button on and off a few times.

29. Move the Opacity slider beneath the drop-down menu back and forth a few times to see how you can adjust the opacity of the effect that you made.

30. Highlight the Background layer so that it is blue.
31. Click on the duplicate layer button to create a duplicate layer.

32. Highlight the new layer and use the arrows on the left of the duplicate layer button to move the new layer to the top of the stack and rename the layer Screen.

33. Add a layer mask to the Screen layer.

34. Click on the layer mask in the dialog box to highlight it.
35. Click inside the image and invert the colors like you did when creating the Overlay mask.

36. Select the Screen layer and select Screen mode from the drop-down menu.

37. Highlight the Screen layer and duplicate the layer.
38. Duplicate it again to triple the screening.

39. Ensure no layer mask is selected in the Layer’s dialog.
40. Right-click on the image and click on File.
41. Click on Save and give the image the name and extension you want.

Note that following the extension, Gimp will save the file. For instance, the files my-pic.jpg and my-pic.tif will be saved as jpg and tiff files, respectively. Gimp is capable of reading the most common file extensions. You should use gimp’s native format, which is.xcf, if you intend to continue working on your layers in the future. Because some other file types, like jpg, do not support layers, gimp will compress your image when saving it as a jpg regardless of how you feel about it. If you have finished creating your image, this is fine, but if not, it will discourage you. We wish you all the best as you learn more and practice more on how to brighten your images in GIMP.

