

A table is a vital tool in Ms. Word. It is used for various purposes; therefore, it is beneficial for all learners to understand how to customize it. Have you ever tried adding more rows to the already created table and got stuck on the way? You can smile now because this article has got you covered. In this article, we shall discuss adding new rows to your table.
Using the table layout tab
Table of Contents
The table layout tab can add more rows to your table.
Adding single row
Here are the steps to follow:
1. To get started, locate the Word application on your Pc. Double-click on it to open the application. To create a new document, click the File button on the toolbar. Then, locate the New button.
You can also use the keyboard shortcuts to open a new document.

2. On the opened document, locate the Insert button on the toolbar.

3. Locate the table drop-down button, and click on it. Select the number of columns and rows you want your table to have.

4. Click on the row where you want to add another row.
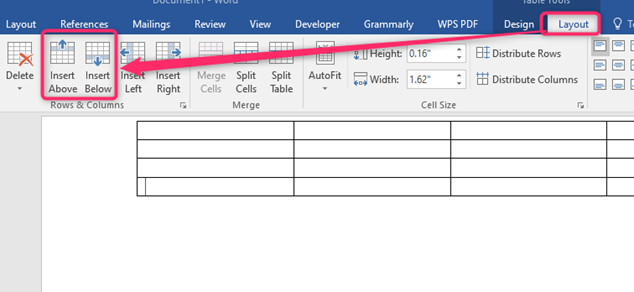
5. Locate the Layout tab on the Table tools section.
6. In the rows & column section, choose either the Insert Above or the Insert below button.
Adding Multiple Rows
Steps to follow:
1. On the created table, highlight the rows that are already there. The number of highlighted rows should correspond to the number of rows to be added.

2. Locate the Layout tab on the Table tools section.
3. In the rows & column section, choose either the Insert Above or the Insert below button.

Using the Right-click feature
Steps to follow when using this method:
1. To get started, locate the Word application on your Pc. Double-click on it to open the application. To create a new document, click the File button on the toolbar. Then, locate the New button.
You can also use the keyboard shortcuts to open a new document.
2. On the opened document, locate the Insert button on the toolbar.

3. Locate the table drop-down button, and click on it. Select the number of columns and rows you want your table to have.
4. Click on the row where you want to add another row.
5. Right-click to open a side-view menu. On the Side-view menu, hover the mouse over the Insert button.

6. Then, choose the Insert row below or Insert row above button.

NOTE:
Insert Above – This button will insert a new row(s) above the current/selected row(s).
Insert Below – This button will insert a new row(s) below the current/selected row(s).
Deleting added Rows
Steps to follow when deleting excess rows from your Word Table:
1. Select the rows you want to delete.
2. Then, Click on the Table Layout tab.
3. Locate the Delete drop-down menu.
4. Then, select the Delete row button.

Alternatively:
1. Select the rows you want to delete.
2. Right-click on the select rows.
3. Choose the Delete cells button.

4. Finally, select the Delete Entire row button, and hit the OK button.
