

A calendar is a vital tool in all organizations. With the Calendar, you can easily plan your days. Google slides allow one to create a calendar that can be used to show the audience important dates in the presentation. Let’s discuss some of the methods of creating a calendar in Google Slides.
Creating Calendar from scratch
Table of Contents
Google Slides allows users to create a calendar from scratch and design it in the way that fits them best. Below are the steps to follow when creating a calendar from scratch:
1. Log in to https://www.google.com/account using your email details. Locate the Google Apps icon and click on it.
2. Then, select the Slides option. If you want the Calendar to fill the entire Slide, an empty Slide. Click on the blank Slide with the plus sign to select an empty slide. However, if you want the Calendar to occupy a certain portion of the Slide, you can add the Calendar to the Slide of that existing document.

3. After opening the empty presentation, click the Slide button on the top tab. Hover the mouse on the Apply layout, and click on the blank option.

4. Click on the Untitled presentation, edit it and add the name of your Calendar.
5. Next, add a table. Click on the insert button, and select the table option. Add a table with seven columns and six rows. The number of table squares will depend on the month you are creating.

6. Add the month’s name on top of the created table. Then, add the names of the days week on the top row. Adjust the size of the table to fits your data.
7. Next, add the days to the other empty boxes. Then, resize the table to fill one Slide.

8. Go to the next Slide, and create another table that will contain the next month’s data. Repeat this procedure for the remaining months.
Customizing Calendar in Google Slides
After creating the Calendar in Google Slides, you can beautify it to fit your desires. Here are some of the tips to customize your Calendar:
1. Make sure your column/ row cells are evenly distributed. Highlight the table, click the Format button, and then hover the mouse on top of the Table option. Then, click either Distribute rows/ column.

2. Next, you can change the font of the table. Highlight the table from the toolbar, and change the table’s font.
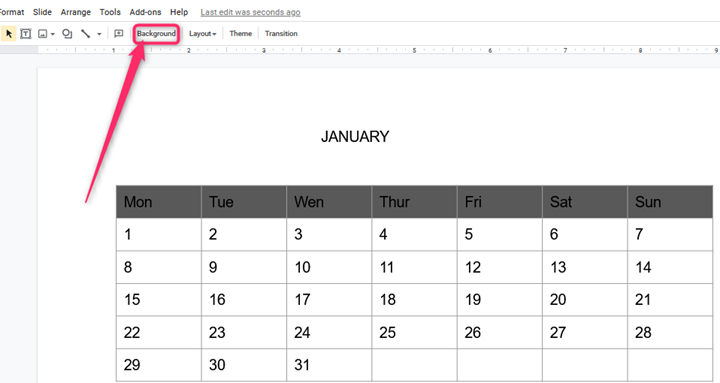
3. Next, you can add a background image. Click on the Background button on the toolbar, and select the image you want to use in the background.
4. Finally, you can fill the table cells with the color that fits you.
Creating a calendar in Google Slides using a Template
Here are the steps to follow when using a template to create a calendar in Google Slides:
1. Log in to https://www.google.com/account using your email details. Locate the Google Apps icon and click on it.
2. Then, select the Slides option. Then, click on the calendar template from the list of templates displayed.

3. Go ahead and edit it.