Sometimes you might take a photo that might be too bright, especially if you take it at night and use a flash camera with too much brightness. Your exposures can become bright as if they were taken during the day when you take pictures in low light. It’s simple to assume that this is okay, and frequently it is, but it also makes it simple to forget that there are situations when a dark image is beneficial, and creating the appearance that a photo was taken at night is acceptable. Making the image more difficult to see, as the scene was to your eye when you took the picture, is perfectly acceptable. This is when you will need to darken your image. You can use the GIMP photo editing software to do this. Depending on your goals, there are a few different ways to darken an image with GIMP. Utilizing the Darken tool from the Colors menu is one option. Additionally, you can use the Hue/Saturation tool or the Brightness slider to change the brightness or darkness of an image. We will provide you with the steps you can use to darken your image in GIMP.
You can use the following steps to darken an image in GIMP:
1. Open GIMP on your computer.

2. Go to the File menu.
3. Click on Open or New to open or create the image file you want to darken.

4. Click on the layer that you want to adjust its brightness in the Layers dock.
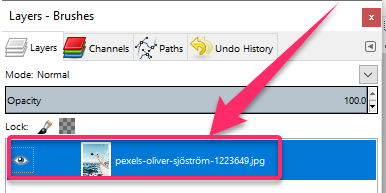
5. If the image you are darkening has not been split into layers, the background layer will be selected by default.
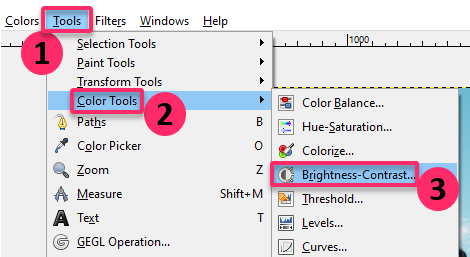
6. Click on Tools in the main toolbar.
7. Select Color Tools.
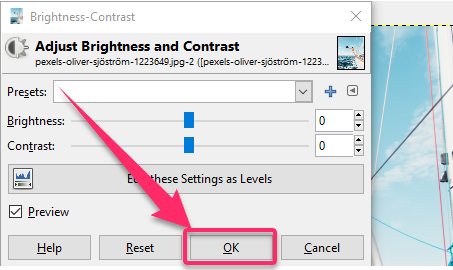
8. Click on Brightness-Contrast to open the Brightness-Contrast dialog box.
9. Adjust the layer’s brightness by using the slide labeled Brightness.
10. Move the slider to the left to make the image darker.
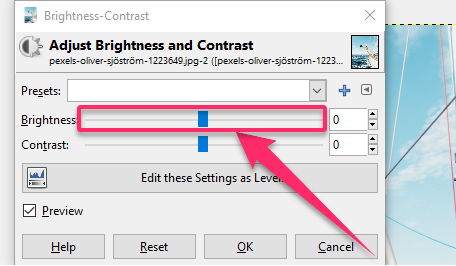
11. The transformation happens uniformly, meaning that it will decrease the brightness of every pixel by the same magnitude.
12. Click OK to apply the changes you made.
13. Go to File.
14. Click on Save As to save the image using a different name.

Your image should now be darker than the original image. Note that if you decrease the brightness of a layer that is too bright overall, the finished image will most likely have an appearance that is washed out. It is because the brightness slider turns the layer’s brightest tones, like white, into darker tones. If you want to adjust the brightness in a non-uniform way, you should use the Curves menu instead. It will let you change the brightness while keeping the layer’s tonal variety. The brightness slider is, however, the easiest way to darken your image using GIMP. You can repeat the steps on any of your other images to darken them according to your preference. We wish you the best as you learn more about using the GIMP software to darken your images and do other editing on your images.

