Any Windows Operating System Users are used to working with Microsoft Word. Microsoft Office Word new documents are automatically set to a default setting; Portrait mode. Any new document you open will have this page orientation automatically set. The format most likely works better with texts and sometimes images. Despite this, a better and more fit orientation works well with large images, graphs, and columns; the landscape orientation.
Luckily, Word allows users to change the format from Portrait to landscape layout. To do this on individual pages or one single page, there are a couple of steps to be followed.
How to set one-page Landscape in word 2010
Table of Contents
1. Open your word document.
2. Scroll through your pages and select the page you want to landscape. For example, if you want to landscape page 3, scroll to the beginning of the page and click there.
3. On the main ribbon, click on the Layout tab.

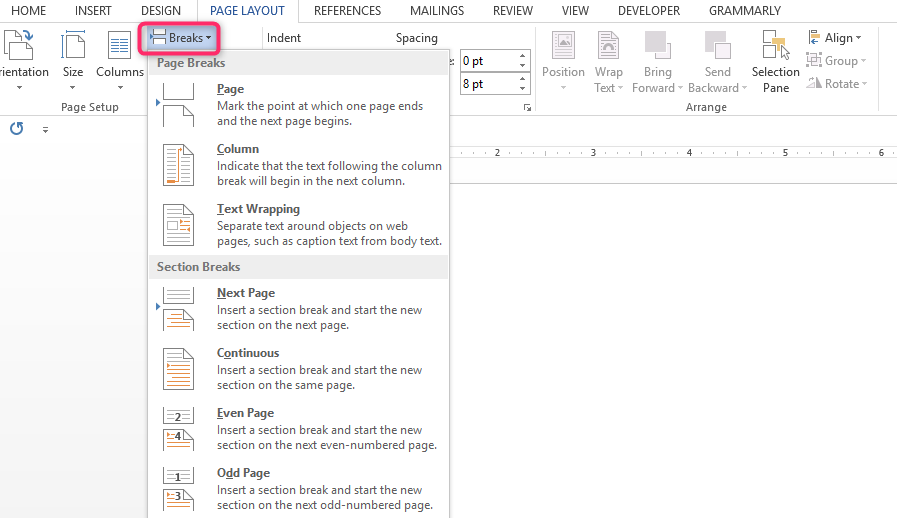
4. On the Page Setup group, click on the Breaks drop-down arrow.

5. On the drop-down menu under Section Breaks, select the Next Page option.

6. Next, go to the Page Layout tab and click on Orientation

7. Select the Landscape option.

8. Afterward, you will need to reopen your home tab to turn on paragraph marks. Under the paragraphs section, click on the Show/Hide Paragraph Marks icon. It will give you an overview of the section break you have already created.

9. Now, you will have to create another section break. Please scroll to the beginning of the next page (in our case, it will be page 4).

10. Repeat the above steps on how to create the section break.
11. Next, go to the Layout tab and click the drop-down arrow next to Orientation.
12. Select the Portrait option. Once done, anything and everything located between the two section breaks will have a Landscape layout.
How to set the Landscape to one page in Microsoft word 2016 & 2019
1. First, place your cursor at the beginning of the page you would like to change to Landscape.
2. On the main menu ribbon, click on the Layout or Page Layout tab.

3. Next, click on Breaks >Next Page to create a section break.

4. Then, go to Page Layout tab > Orientation > Landscape. All the pages from your previous one will be marked in the landscape orientation. Now, to make sure only one page is displayed in the landscape layout, you will need to change the next page back to portrait.

5. Place your cursor at the beginning of your next page that you want to remain in portrait mode.
6. Go to the Page Layout tab > Breaks > Next Page to create another section break.
7. Next, go to Page Layout > Orientation > Portrait
You can also make these changes by first highlighting the contents of the page you want to landscape. Next, go to Layout tab > Page Setup section. Here, you will click on the arrow icon found in the right corner to open a dialog box. Under the orientation section, click on the Landscape icon. Next, you will click on the Apply to drop-down arrow and click ‘Selected text.’ Lastly, click on OK. You will notice that the highlighted section will show on a different page with Landscape orientation. Thie method is easier as you do not have to add section breaks first.

